In this video, I go over the spreadsheet that I use to organize my song ideas. It’s super basic. You can find the template here: https://docs.google.com/spreadsheets/d/1wJfdVd7DQBBmB4EBAfijpoM09FXht2GVTJXMoLP3bfg/edit?usp=sharing
Category Archives: The Man(womanchild) Behind The Curtain
To share some hard-won experience, I’m introducing a new section on this site called “The Man(womanchild) Behind the Curtain.” Each week I’ll be posting thoughts as well as links I’ve found useful.
–David Child
Podcast Episode: The Fiverr Song Project
[display_podcast]
Check it out! I’m launching my podcast, Sample Size: 1, today. In the first episode, I explore the bizarre world of Fiverr, a website that lets you purchase services for five dollars. As an experiment in online music collaboration with strangers, I take one of my own songs and replace each instrument track with a new recording made by a Fiverr session musician. The episode chronicles the process and culminates in a version of the song produced entirely by the Internet.
–David Child
A Guide to the Manwomanchild Electric Guitar Sound
A while ago, I was asked what kind of guitar amp I use for Manwomanchild recordings. Of course, our guitar sound is due to a number of pieces of kit, not just the amp. In the interest of providing a complete picture, here’s a full gear guide to the Manwomanchild electric guitar sound: Fender Jazzmaster, ProCo Rat, MusicMan Sixty-Five, Vintage Celestion 30 Speaker, etc.

I play a Fender Jazzmaster…
Almost all of the electric guitars you hear on our records are this thing. It’s been slightly modified by the folks at Amherst Music House–I think they swapped out one of the pickups with a Duncan Quarter Pounder and changed something about about the switch wiring. It’s everything I would want from a guitar: easy to play, sensitive to dynamics, has a beautiful clean sound but works well with distortion. If I ever lost it, I would buy another in a heartbeat.

…which I plug into a ProCo Rat
This is the only effects pedal I actually use, and I don’t use it all that much. As a general rule, any solo that you hear me play will be a combination of this ProCo Rat and the distortion on the Music Man Sixty-Five. There’s considerable talk on message boards about how older ProCo Rats are somehow different and better from new ones. I don’t know if that’s really true. Mine is probably from the early ’90s.
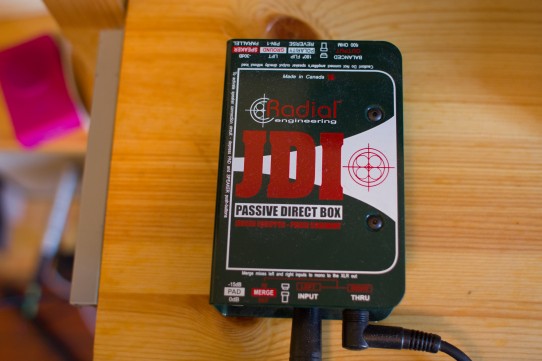
…and that’s plugged into a Radial DI Box
After recording at Machines With Magnets, I picked up one of these. It has a DI “thru” output so that you can record both the output from your amp and the direct output from your guitar at the same time. This can be useful if you feel like you recorded the perfect take, but don’t love the amp sound you used (or just want to double it with another amp). In such cases, you can output your recorded DI track back to your amp and re-record it without having to replay anything. That being said, it occurs to me as I write this that we have never once done this. We do use the direct input for bass recording, though. The sound of my bass guitar is roughly 70% heavily compressed DI track, and 30% output from the amp.

…all of which gets plugged into my Music Man Sixty-Five Amp
I love this thing. All of the guitars on all of our recordings are done with this amp. I bought mine off eBay about twelve years ago after seeing a photo of Television playing with similar one in the 70s (a stupid reason to buy gear, but it worked out well for me). One of the best things about it is that when the gain is turned up it’s extremely responsive to my playing style. It has a beautiful clean sound, but if you hit the strings hard it will get dirty in proportion to how hard you play. I went through a ton of amps before finding the right one for me. If I lost this amp, I would definitely by another. This amp has both a bass and a regular guitar channel. The bass channel would probably be completely ludicrous to use live as an actual bass amp, but we do use it occasionally to add some coloration to our bass tracks.

…through a Tom Scholz Power Soak
This goes in between the amp and the speaker. It allows me to turn the amp up above 3 without shaking the old wooden floors here. There’s a lot of talk on message boards about how vintage tube amps only sound good when they’re cranked up to 8. I don’t know if that’s really true, but it can’t hurt, so we do it.
…and into 1×12 Celestion Vintage 30 Speaker
The Vintage 30 is a great recording speaker. Not much more to say about that. The weird homemade cab that I’ve been using for the past decade is something I found in the old AMVETS Thrift Store in Allston, MA. Don’t really know much about it except that it’s lined with some super gross fur on the inside.
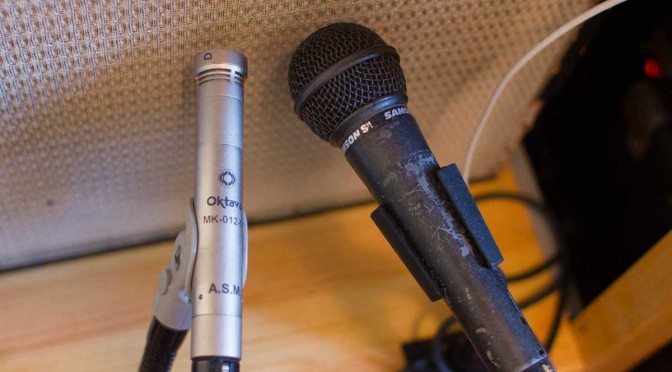
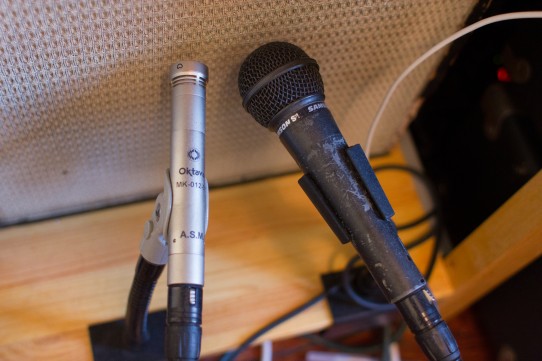
…which gets miced by two Mics: a Samson S11 and an Oktava MK-012-01 Condenser Mic
When you don’t have a tremendous amount of cash to spend on gear, you can mask a multitude of sins by doubling up on things. Instead of mixing through one set of downmarket speakers, use two; instead of one mic for your guitar amp, use a couple of those as well, etc. We record these both simultaneously on two different tracks along with a direct input track from the Radial DI box on a third. I then mix two or three of these to taste later. If I’m not into the tinniness of the Oktava, I turn it down a bit in the mix relative to the Samson. Speaking of which, there’s a lot of crazy debate online about these Oktava condenser mics. Some people say they’re secretly amazing mics being sold for pennies, other people say they’re complete shit, and still others claim they used to be amazing, but now they’re made by someone else and are indeed shit. If that’s the case, I don’t really know which version I have. Mine sounds decent on its own, but great when combined with the Samson S11. The S11 is just your standard SM58 clone. I do have an SM58 as well, but I like the S11 slightly more because I’m used to it.
OK. That’s pretty much it for the electrics. I’ll do another post next week about the acoustic and bass guitar sounds.
—David Child

The Process: Weekly Review

In the last blog post, I talked about how I carry around an audio recorder with me wherever I go. It’s a great way to capture melody ideas when I’m not near my main music computer. That being said, these song sketches pile up really, really quickly. If I didn’t have a system in place for organizing them, I’d have hundreds of audio files with cryptic names all over my desktop in no time. As promised, this week, I’m going to cover how I deal with this song ideas after I’ve recorded them.
As you’ve probably gleaned from this post’s title, once a week, I review all of the song ideas that have accumulated on my iPhone. I save the best ones in a catalog of song parts so that they can easily be assembled into full songs later.
Usually, I do this on my desktop computer and with an acoustic guitar within easy reach so that I can play with the ideas and come up with other related ideas before archiving them. The first step is to get all of the song pieces into a folder on my music computer. Next, I go through each of the files in the folder. For each piece, I follow these steps:
- Identify what it is — Is this a bridge, a chorus, a full song? Most often, ideas come to me in pieces although I do occasionally — in a moment of clarity — get lucky enough to write a full song in one sitting.
- Make a snap decision about it — Is this good enough to save? If I listen to an idea and it doesn’t do anything for me, I delete it immediately. There’s no point in wasting valuable time polishing something that doesn’t have any clear potential. Nothing feels better than deleting something sub-par–it reminds me that I am actually exerting some creative control over this process and that I’m not totally at the whim of my own inspiration.
- Usually, at this point, the files don’t have descriptive names. My next step is to name the file. This is usually based on whatever placeholder lyrics I happened to sing in in the original recording. I’ll usually start the file name with a letter and a number. The letter lets me know what type of song part I think this is: “B” for bridge; “C” for chorus; “V” for verse; “S” for full songs. I choose a number that’s one higher than the last one I used. Here’s an example: B017_you_you_took_me_by_surprise.mp3. From this file name I can tell you that: a) this is a bridge; b) it’s the 17th bridge; c) it contains the placeholder lyrics “You, you took me by surprise.”
- Sometimes, if the song is in a weird key that’s out of my range, I’ll figure out what would be the ideal key for the part is and re-record the song part at this point. I’ll also try to figure out the range of workable keys. Ultimately, there’s a high likelihood that I will need to change the key that a part is in order for it to work with other parts in a song. It’s useful to know how low or how high I can sing a part and still have it work.
- Next, I figure out the tempo of the part. I do this by tapping along to my demo using the “tap” functionality on my drum machine, but a website such as this works just as well. I also try to figure out the slowest and fast tempos for which the song part still works.
- The final step is by far the most important step. I enter the song piece into a list of song parts I keep. The list has a few columns. Here’s a sample row:
File Name Ideal Key Key Range Ideal Tempo Tempo Range Rating B017 you you took me by surprise.mp3 G# E-A 150 150-155 ☆☆☆☆ Here’s a quick rundown of the columns:
- File Name – Self-explanatory.
- Ideal Key – The key in which this part sounds best. In the example above, the part sounds best in the key of G#maj.
- Key Range – If the part’s key needs to be changed, how far up or down from the ideal key can it be transposed and still sound good? In the example above, the range is from Emaj up to the Amaj above it.
- Ideal Tempo – The tempo (in BPM) at which the part sounds best.
- Tempo Range – Similar to key range, if the part needed to be slowed down or sped up, how far can we push it and still have it sound good?
- Rating – A quality rating (1-5 where 5 = best) for the part. Generally anything less than a 3 stars won’t stay in my song parts list for long.
- Repeat until all of my songs parts are either cataloged or discarded.
That’s it! I do this every week. It usually takes me a half an hour or so for all of the parts. Periodically, I’ll go into the song pieces folder on my computer and try out different combinations. When I’ve used a part in one of my songs, I’ll put a (*) next to name of the part in the list so that I know not to reuse it elsewhere. Once I’ve got two or three parts that can be combined into a full song, I’ll record a quick acoustic demo of the pieces working together, and then get to work on actually recording the song in earnest.
Hope this helps!
–David Child
The Process: Song Sketches
Anyone who has ever made a habit of writing music knows that song ideas almost never occur to you when you’re looking for them. My solution to this has been to carry a recording device with me at all times. Whenever I have an idea, I slip off somewhere quiet and sing it into the recorder.
When I first got started, I used to use a microcassette tape recorder to capture my ideas (it wasn’t all that ‘micro’ either). I have distinct memories of wandering the streets of Boston singing into this clunky box while trying not to make eye contact with strangers. Nowadays, smartphones are a much more convenient way to capture ideas. There are hundreds of apps for capturing voice memos; even the default iPhone Voice Memo app is a huge leap forward from the microcassette recorder days. Better still, free cloud-syncing storage services such as Dropbox or Evernote have revolutionized the way I work. Evernote is great because it allows you to record any number of song ideas right from its iPhone App and then sync them back to your desktop computer to continue work at home. With Dropbox, I use the Griffin iTalk or DropVox, both of which accomplish the same thing.
Here are some tips that I follow when making my song sketches:
- Tip #1: Placeholder lyrics – If I don’t have a recording device available when inspiration strikes, I attach placeholder lyrics to my melody as soon as possible (I jot them down on a scrap of paper or in my phone). Lyrics are a great way to remember a tune, although (of course) nothing beats a recording.
- Tip #2: Don’t be afraid to sound ridiculous – No one will hear my song sketches except me. If the melody is out of my vocal range, I keep it in whatever key occurs to me; I can always transpose it down to something I can sing comfortably later.
- Tip #3: Record first without backing – Even if I’m near an instrument when inspiration strikes, I record sketches without any backing or chords first before attempting a version with the backing. The reason is this: attaching chords to a melody can actually substantially change an idea (listen to any of the Girl Talk records for intentional examples of this). Sometimes, it’s useful to have a version of a melody before the chords were added.
In the next blog post, I’ll be covering what to do with the ideas once you’ve gathered them.
–Dave

Organizational Tip: Number Your Songs!

Staying organized is crucial when you’re working on an album. The importance of this is easy to overlook at the start of a project. Once you commit yourself to saving all of your ideas, it doesn’t take long before you are buried in audio files and scraps of paper and can no longer remember which pieces belong to which song. This is why it is essential to have some system in place for refer back to your work.
When I first got started recording my own work, I expected that I would be referring to songs by their titles. The problem was, when I first started working on a new song, I almost never had a title for it yet. I usually didn’t have more than a few lines of placeholder lyrics hastily sung into a tape recorder. If the first line was “Back when I was young,” I would save my song demo in a folder call “back_when.” My thought process was “Well, of course I’ll remember which song this is. It’s the song that begins ‘Back when…'” There are so many problems with this approach: lyrics change, song titles change, sometimes a song part that was going to be used in one song ends up in another. Three years down the road, the phrase “Back when I was young” won’t jog your memory at all.
I was looking around for other solutions, when I remembered reading that Mozart was so prolific that, after his death, a musicologist named Ludwig von Köchel came up with a special numbering system for all of his work: every piece of music he wrote was assigned a Köchel number (or K-number). Now, instead of just referring to a piece as “Sonata in C for Violin and Keyboard” (for all we know, Mozart might have written ten other sonatas in C for violin and keyboard), people refer to “Sonata in C for Violin and Keyboard K. 28”. (You can see the full Köchel Catalog for Mozart’s work here.)
The train of thought that followed is probably obvious by now: what if someone had a Köchel catalogue for their work… and was also still alive at the time to enjoy it? How useful would it be to have an index of every song you had ever worked on (finished and unfinished)? I immediately went back into my archived song ideas folder. I pulled up the first scrap of a song I found. This would be song 001. Since it started with the lyrics “Back when I was young…” I put it in a folder called 001_back_when. The second scrap I found became 002, the third 003, etc. In this way, the songs would be listed in numerical order in the directory, and I would still get to keep a scrap of the placeholder lyrics form the song to help jog my memory. Unlike the actual Köchel Catalog, which made attempts to be chronological (not always easy when new Mozart compositions continued to be discovered even after the catalog’s publication), I don’t really care about when a song was written. If I discover an old song that was unnumbered, I just give it the next number in the series.
If I delete a song, I empty the folder, but I always keep the folder itself as a placeholder (renaming it as follows: “0009_deleted”).
So that’s it. Pretty simple. Even if this is the only organizational measure you take, it’s totally worth it. As long as you keep on numbering your songs and use a consistent file naming convention, you will automatically have a catalog of all of the songs you have ever written just by looking in the directory where you keep your song files. For physical content (lyrics sheets, music, whatever) I have a small file box. Each time I finish with a piece of paper, it goes into a folder labeled with the song number is belongs to. Even more useful, each lyric sheet has the song number written on it and circled. If I want to know what I’m looking at, I just look in the top-left for the circled number.
Hope this helps!
–David Child
The Man(womanchild) Behind The Curtain: Introducing…

Hi Everyone!
David Child here. It occurs to me that I’ve been making and releasing music for a while now, and there is so much about the process that I wish I’d been told when I first started. To share some hard-won experience, I’m introducing a new section on this site called “The Man(womanchild) Behind the Curtain.” Each week I’ll be posting thoughts as well as links I’ve found useful.
Continue reading The Man(womanchild) Behind The Curtain: Introducing…
How to Build a Basic Standing Desk
Hi, David Child here. I wanted to do something a bit different with this blog post. Instead of talking about music or art or movies (that’s pretty much been the scope of this band’s blog so far), I wanted to provide a little IKEA Hackers-style How To guide on building the standing desk I use. If you’re not into How To guides, skip this post. I promise the next one will be about MANWOMANCHILD. Anyway, here goes…
The year was 2012 and standing desk fever was sweeping the nation — or at least a small number of articles were written about the benefits of standing and a handful of people who had nothing better to worry about chose to pursue the idea somewhat seriously for a few months before inevitably returning to sitting. My friends, I was one of those people. (And I still am. I’ve actually just made it to the one-year mark and I still do almost all of my recording standing up.)
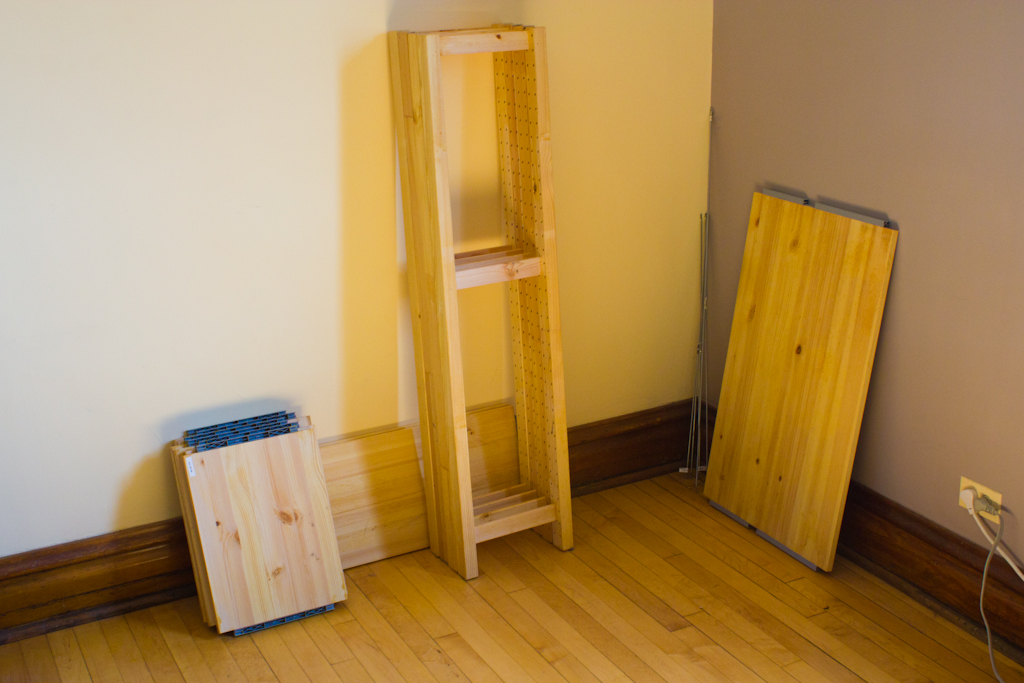
I looked around for a cheap standing desk, and there were a bunch of options, though nothing that would accommodate all of the stuff in my home studio. Also, all of the standing desks on the market were shockingly expensive. The New York Times had recommended a $4,000 desk. Feeling ambitious, I decided to build my own out of IKEA shelving.
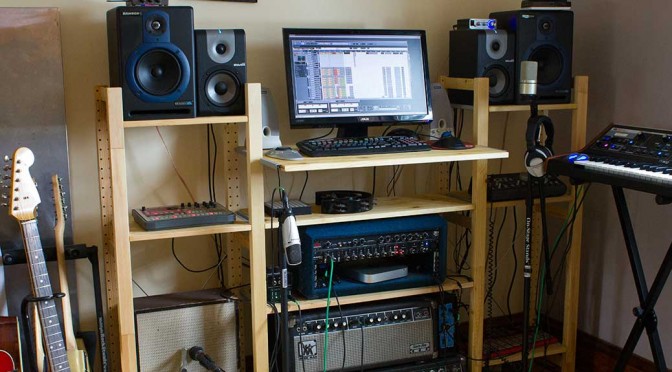
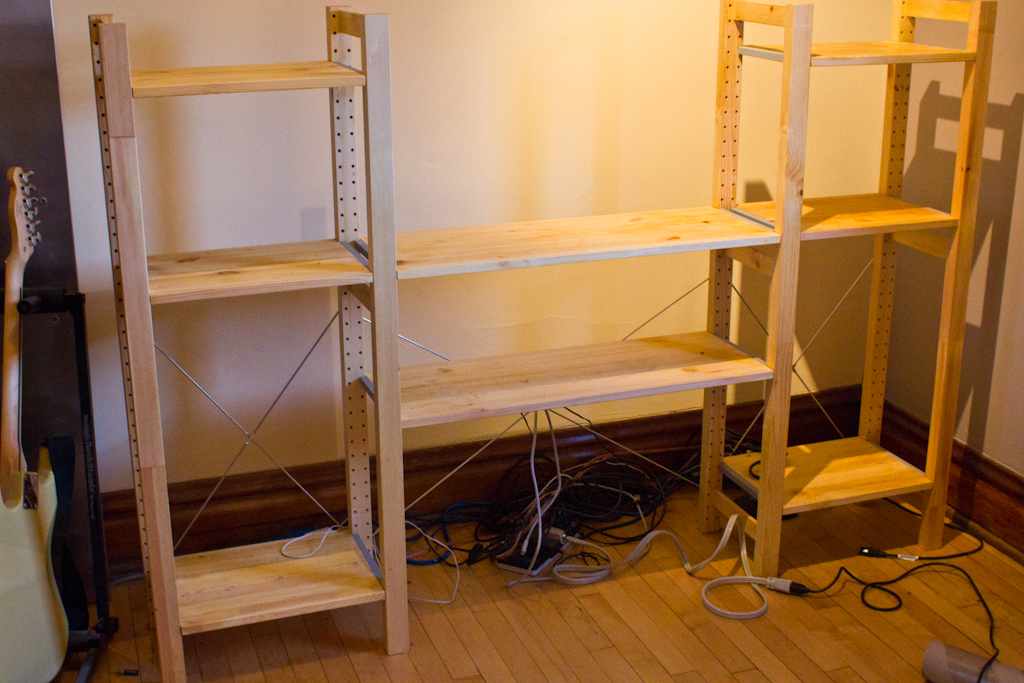
Before you embark on this journey with me, you should be forewarned that the finished product looks like this:
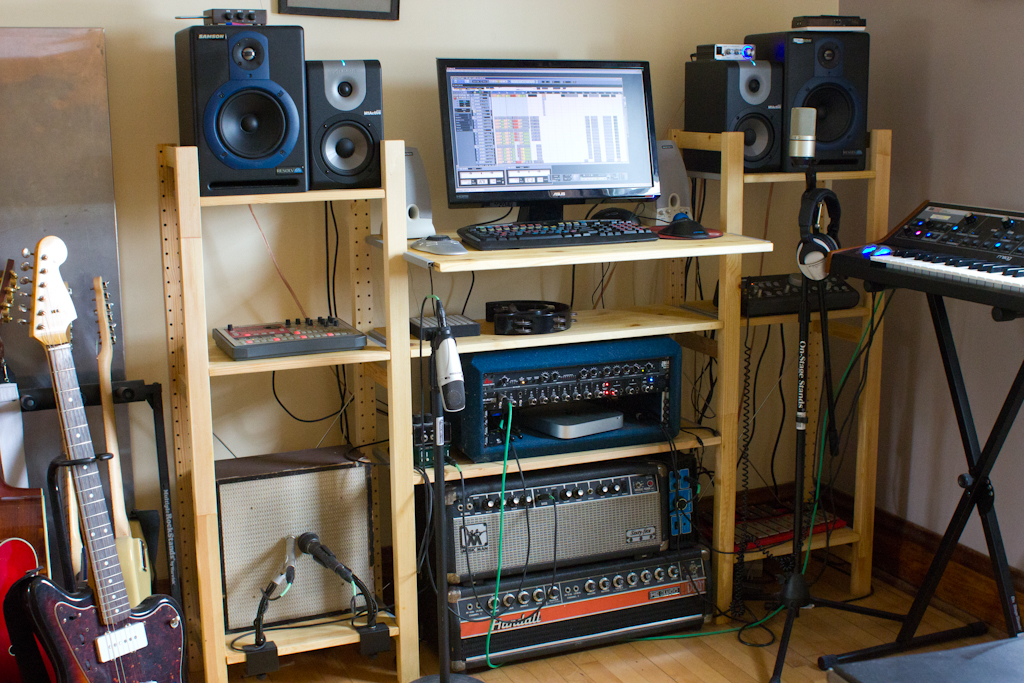
It’s not the most beautiful thing in the world, I know, but I’ve been extremely satisfied with it. It contains all of the studio gear I use (my computer, my speakers, my amps, my 1 x 12″ speaker cabinet, etc.) and, most importantly, it’s exactly the height I wanted. (All of the articles I’ve read say that the shelf should be exactly the height of your elbows.)
Construction
So, you ask, how can I own one of these beauties? Well, since you asked, the whole thing is based on the IVAR Shelving System. The specific parts that went into making this are as follows:
- 4 x IVAR 12“ x 49” Side Units ($8.00/pc): The four side supports.
- 6 x IVAR 17“ x 12” Shelves:
These are the side shelves that hold up the speakers and various other pieces of equipment in the photo above. - 2 x IVAR 33“ x 12” Shelves: These are the two lower shelves in the middle.
- 1 x IVAR 33“ x 20” Shelf ($12.00/pc): The top shelf, that the computer monitor sits on.
- 2 x OBSERVATÖR 28″ Braces ($5.00/pc): These are used to hold up the two sides.
- 1 x OBSERVATÖR 39″ Brace ($5.00/pc): This is used to hold up the middle shelving section.
I also bought a can of shellac so that I could protect the wood, but that’s really not necessary. Here’s what all of the parts look like on their own:
You’ll notice that my big shelf on the right-hand side of the image has two notches cut in it. Those were not there when I bought the parts. We’ll get to those later. I’m not going to go into a huge amount of detail about the basic construction of the shelf, because this part is fairly straightforward. You should know that I put the whole thing together on the floor without the extra-large top shelf. Here’s a photo of that:
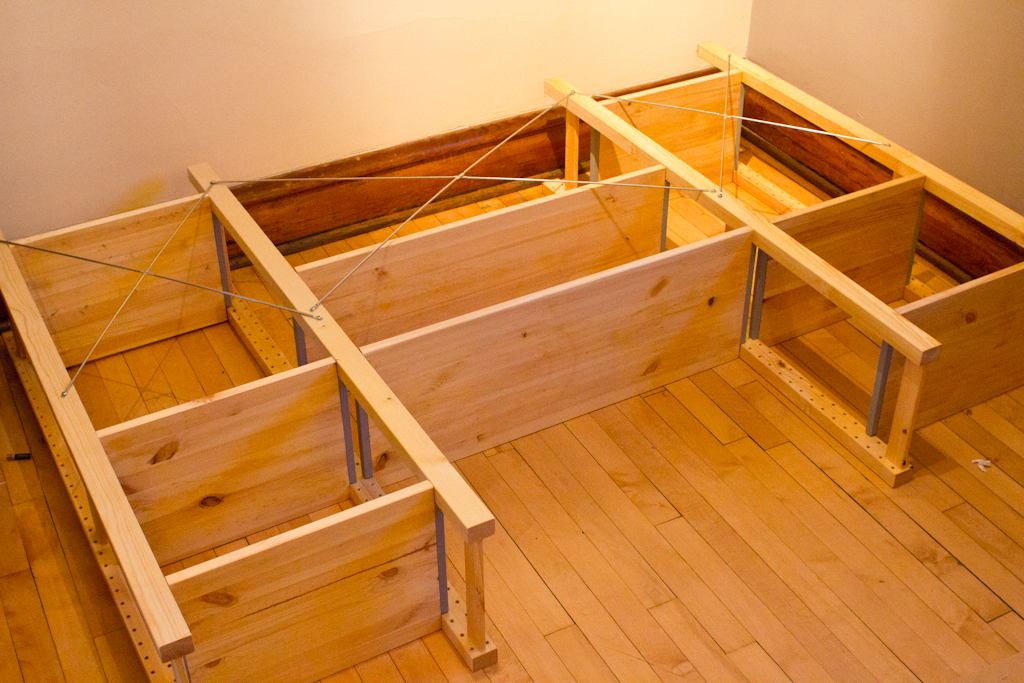
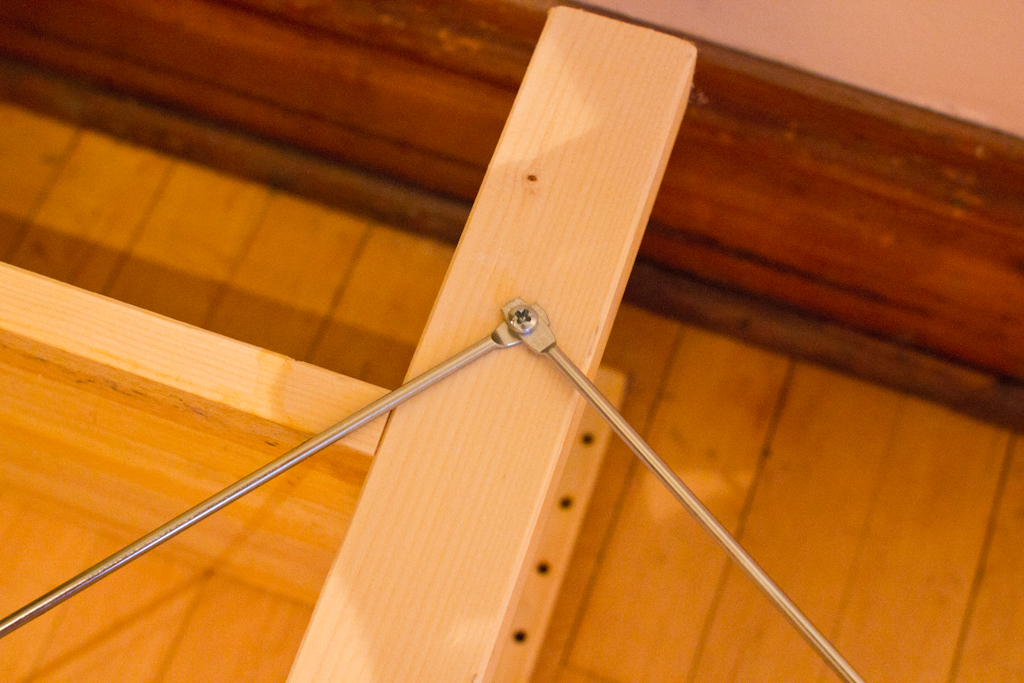
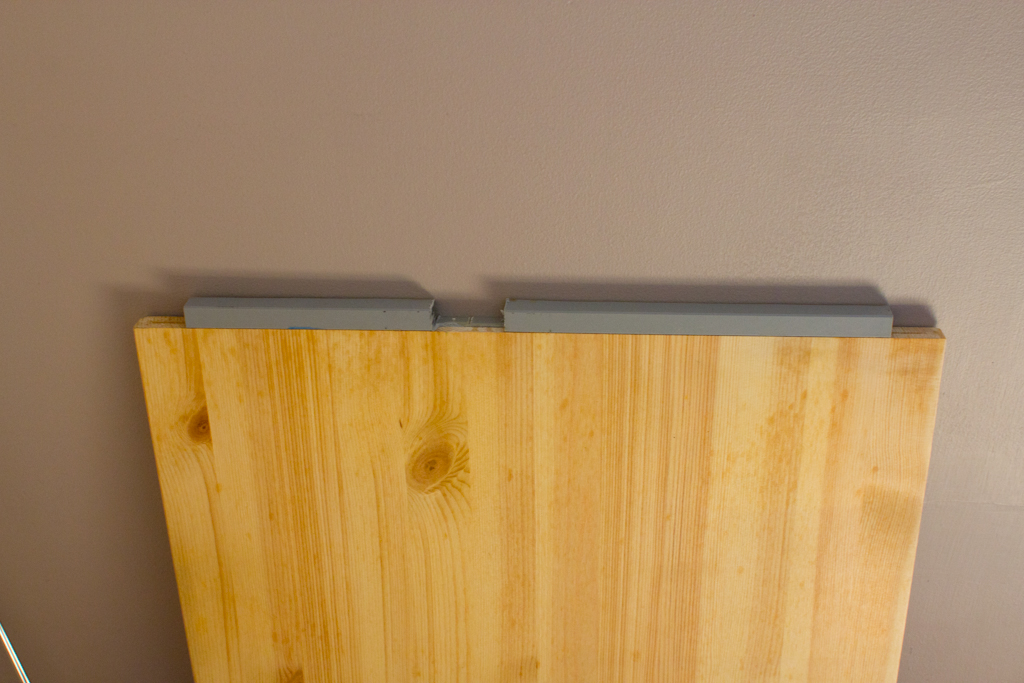
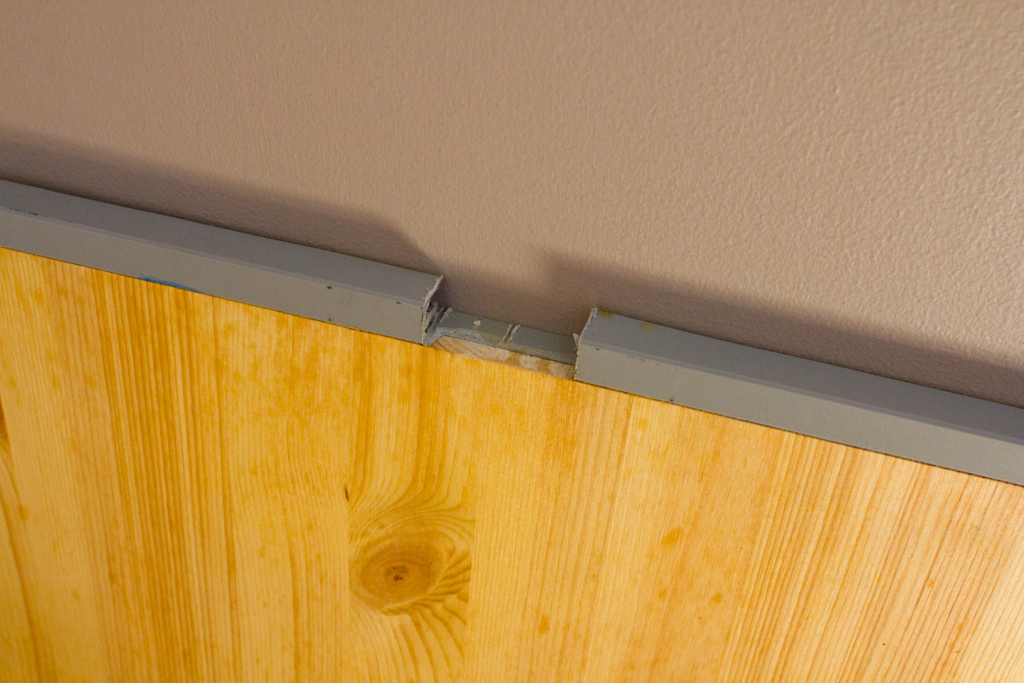
Attaching the 3 metal OBSERVATÖR cross-braces was an odd process. I used a level and a few square-shaped objects to make sure that the whole thing was at right angles. Then, I drilled holes in the side supports and screwed the braces in. The entire shelf (all three parts) are symmetrical but the top hole spots for the middle brace and the side braces don’t line up at all. This is normal. You can see what I mean in the photos that follow. This is the point at which the middle brace meets the side brace at the bottom:
And this is where they meet at the top:
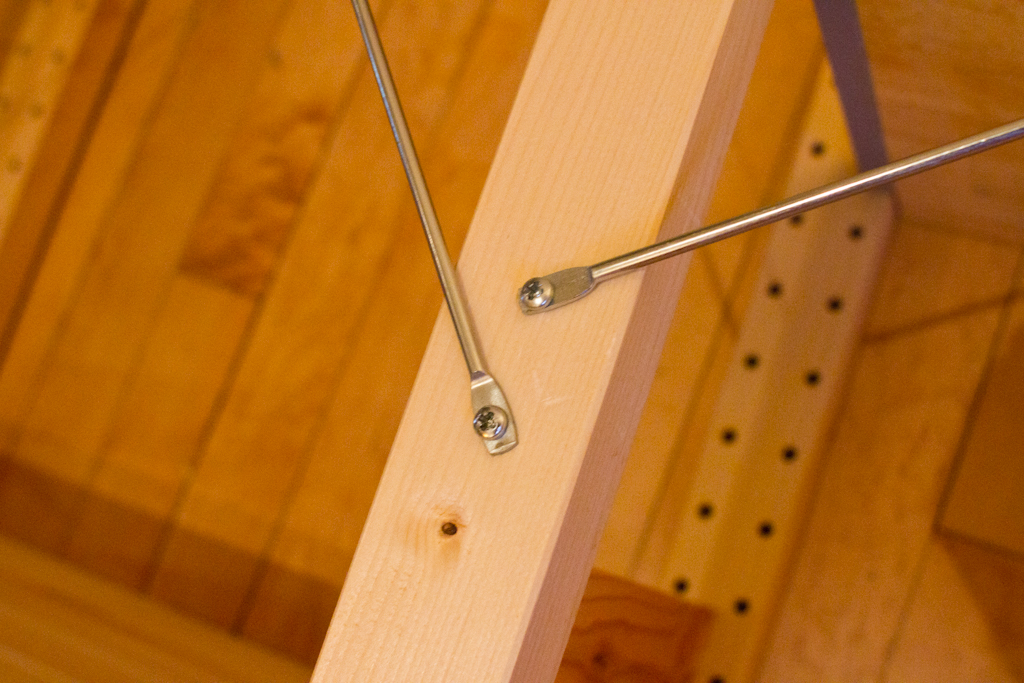
As I said, this is totally normal.
Once I had the whole shelf constructed, I upended it:
OK. The final step is to attach the large 33“ x 20” shelf, but before we can do this, we need to take a hacksaw (or other implement) and cut notches or rectangular chunks out of the plastic. This is what the notches look like:
The best way to figure out exactly where the notches should be is to lay the shelf down on the floor next to one of the side-support braces and use the brace as a guide. (“Measure twice, saw once,” or whatever the expression is.)
Once your done, all you have to do is put that top shelf on and celebrate. Note: I actually attached my desk to the wall to keep it from moving while I typed, or from falling over if I applied too much pressure to that top shelf.
OK. That’s it. I hope you enjoyed this project guide.
–David Child